网站的登录和注册,大家肯定不会陌生了,而对于玩drupal的朋友来说,更不会陌生吧。接触drupal不久,也并不怎么会使用其核心的东西,就比如说我要在页面头部加一个“登录 | 退出”这样的链接,就会让我够受的了,如果要像下面图示的User Login框
8 |5 S' ?8 _* I# K# W# D9 A' \头就更大了。所以这次花了大力气专门去了解和学习这一块的东西,终于还是让我实现了,为了像我这样的初学者不在头痛,贴出来分享,希望能给需要帮助的朋友带来一丝灵感。那我们开始吧:
/ @9 B/ ]/ z0 K! [: j: s" Y第一种方法:在page.tpl.php添加User Login
# F- l5 T/ _6 G" S+ T1 x8 e这种方法就是在你的主题下的page.tpl.php文件中加上一些User Login的代码,这些代码还是算比较简单的,只要稍有一点PHP基础的朋友都是没有问题,像咱这种没有PHP概念的,还是需要花点时间学习一下。好了我们先来看需要增加的代码吧+ W, @! b- F" ?. E0 t& ]7 d# w
page.tpl.php:, L! d8 ~3 ^& ~+ Q
<?php if($user->uid): ?> <aside class="login-bar c4"> <span>Welcome:<?php print l($user->name,'user/'.$user->uid); ?></span> <?php print l("logout","user/logout"); ?> </aside><?php else: ?> <aside class="login-bar c4"> <?php print l("Login | Register","user/login"); ?> </aside><?php endif; ?>
0 v; p: J' N& l( S我们就一起来看看这些代码是什么意思吧?首先就是一个条件判断语名if ...else...上面的代码拆分出来就如下: O9 v# w$ I! K5 `
<?php if($user->uid): ?> //code1 <?php else: ?> //code2 <?php endif; ?>1 N' t9 r2 \/ y) S. m6 Y
表示当用户指向自己uid是true时就执行code1否则就会执行code2,现在我们主要来看code1和code2执行后会出现什么,这才是我们的关键,先来看code1:2 `, A% M& [5 ?% x
<aside class="login-bar c4"> <span>Welcome:<?php print l($user->name,'user/'.$user->uid); ?></span> <?php print l("logout","user/logout"); ?></aside>
J( X& b/ q0 d C0 J( V这段代码就会出现当你登录你的网站后,会在你的页面上显示"Welcom: XXX Logout"其中XXX 和Logout都是有链接的,其中点击XXX会进入到用户帐号管理页面,如下图所示7 b4 m" |3 i9 g0 i( D8 s2 F' e
而点击"Logout"就会退出你所登录的页面;接着我们来看code2的代码:# L& H, f9 r# X0 ^! o4 }5 f
<aside class="login-bar c4"> <?php print l("Login | Register","user/login"); ?></aside>6 D# O; J/ K' Z
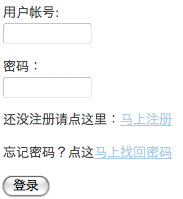
这段代码就是说,当你没有登录页面时,会显示"Login | Register"这也是一个链接,点击后你会进入到用户登录页面,如图:1 p$ y/ ^; j( x4 Y0 f) X
这就是我所讲的第一种实现User login Bar的方法,这里需要提醒的是,这段代码你需要放在哪个位置,可以随你的爱好,但文件位置必须是page.tpl.php文件,千万记住了哟。
: F% X3 L R7 D9 A( V' j第二种方法:创建Block来制作User Login
) P4 u! a3 ^: b5 k. B4 m在使用这种方法之前,你必须开启PHP filter模块,因为我们需要在block的body标签中编写一些php代码,为了能识别这些php代码,所以要开启这个模块,具体如何开启模块就不用我说了吧。模块开启后我们就需要进入增加Block的页面。在Drupal7中你可以点击菜单栏的"Structure > Blocks > Add block"或者直接在地址栏中输入(admin/structure/block/add)。如图
: B a- i( D, G0 s! u5 _具体我们在这里只讨论如何在Block中的body中增加我们需要实现User Login的登录框,只需要把下面的代码复制到你的block body中,修改相应的内容就可以大功告成:
% Q1 f; |' P. c' V( JPHP Code:3 X$ V! p+ _& q1 k/ T! [0 Z! t: V
<?php global $user; ?><?php if ($user->uid) : ?><span class="login_text">欢迎光临W3CPLUS, </span> <?php print ($user->name); ?> <br>//打印出欢迎词<?php print l("您的帐号",'user/'.$user->uid); ?> |//打印用户帐号,并带有链接,可进入用户的帐号管理页面<?php print l("登出","user/logout"); ?>//打印出退出链接,点击退出到首页<?php else : ?>//下面代码创建没有登录前的User Login表单元素<form action="/user?<?php print drupal_get_destination() ?>" method="post" id="user-login-form"> <div class="form-item">//创建用户帐户栏 <label for="edit-name">用户帐号:</label> <input type="text" maxlength="60" name="name" id="edit-name" size="20" value="" tabindex="1" class="form-text required" /> </div> <div class="form-item">//创建用户密码栏 <label for="edit-pass">密码:</label> <input type="password" name="pass" id="edit-pass" size="20" tabindex="2" class="form-text required" /> </div> <div class="form-item">//创建注册链接栏 还没注册请点这里:<a href="/user/register" title="点这里马上注册">马上注册</a> </div> <div class="form-item">//创建找回密码链接栏 忘记密码?点这<a href="/user/password" title="忘记密码?找回密码?">马上找回密码</a> </div> <div class="form-actions">//创建登录button <input type="submit" name="op" id="edit-submit" value="登录" tabindex="3" class="form-submit" /> </div> <input type="hidden" name="form_id" id="edit-user-login" value="user_login" /></form><?php endif; ?>
+ Z+ _# s3 }& ?1 K& H: ~( w现在代码完成了,可先不要急着点击“保存”,因为我们还需要一个重要步骤,我们需要在"Text format"的下拉选择框中选中"PHP code"(这就是刚才我们为什么需要开启PHP filter模块的原因),选好后我们就可这个刚创建的User Login block放在哪个主题下的哪一个region中,如下图所示:( w+ T3 R. G2 ^9 @. L, D
点击“Save"后我们就能看到左边样刚才添加的User Login了,效果正如我们开篇前的那个例子图片。
. B4 y/ T- N3 Y: K& w8 b第三种方法:覆写user.modul中的函数
) d0 K# e5 p; t) ^; p4 L1 f这个方法会比较复杂一点,首先我们来看看user.module中的两段代码:, m! d' s, K/ \$ h9 |. \( M
User_login_block()函数代码:
* [9 P& _ i; ^5 v3 U9 r/** Source: module/user.module*/function user_login_block($form) {//定义与一个login区块form函数 $form['#action'] = url($_GET['q'], array('query' => drupal_get_destination()));//用到user_login_default_validators验证函数 $form['#id'] = 'user-login-form'; $form['#validate'] = user_login_default_validators(); $form['#submit'][] = 'user_login_submit'; //定义用户名表单 $form['name'] = array('#type' => 'textfield', '#title' => t('Username'), '#maxlength' => USERNAME_MAX_LENGTH, '#size' => 15, '#required' => TRUE, ); //定义密码表单 $form['pass'] = array('#type' => 'password', '#title' => t('Password'), '#maxlength' => 60, '#size' => 15, '#required' => TRUE, ); //创建登录submit $form['actions'] = array('#type' => 'actions'); $form['actions']['submit'] = array('#type' => 'submit', '#value' => t('Log in'), ); //返回item数组,主要是创建帐号和找回密码两个链接 $items = array(); if (variable_get('user_register', USER_REGISTER_VISITORS_ADMINISTRATIVE_APPROVAL)) { $items[] = l(t('Create new account'), 'user/register', array('attributes' => array('title' => t('Create a new user account.')))); }//创建新帐号链接 $items[] = l(t('Request new password'), 'user/password', array('attributes' => array('title' => t('Request new password via e-mail.'))));//创建找回密码链接 $form['links'] = array('#markup' => theme('item_list', array('items' => $items))); return $form;}7 o6 J, N8 M; E# D9 r; R% ^' F* v: G: a
Hook_block_view()函数:. ] z5 ]4 a; M+ V" Q" V; `
/** * Implements hook_block_view(). */function user_block_view($delta = '') { global $user; $block = array(); switch ($delta) { case 'login': // For usability's sake, avoid showing two login forms on one page. if (!$user->uid && !(arg(0) == 'user' && !is_numeric(arg(1)))) { $block['subject'] = t('User login'); $block['content'] = drupal_get_form('user_login_block'); } return $block; case 'new': if (user_access('access content')) { // Retrieve a list of new users who have subsequently accessed the site successfully. $items = db_query_range('SELECT uid, name FROM {users} WHERE status <> 0 AND access <> 0 ORDER BY created DESC', 0, variable_get('user_block_whois_new_count', 5))->fetchAll(); $output = theme('user_list', array('users' => $items)); $block['subject'] = t('Who\'s new'); $block['content'] = $output; } return $block; case 'online': if (user_access('access content')) { // Count users active within the defined period. $interval = REQUEST_TIME - variable_get('user_block_seconds_online', 900); // Perform database queries to gather online user lists. We use s.timestamp // rather than u.access because it is much faster. $authenticated_count = db_query("SELECT COUNT(DISTINCT s.uid) FROM {sessions} s WHERE s.timestamp >= :timestamp AND s.uid > 0", array(':timestamp' => $interval))->fetchField(); $output = '<p>' . format_plural($authenticated_count, 'There is currently 1 user online.', 'There are currently @count users online.') . '</p>'; // Display a list of currently online users. $max_users = variable_get('user_block_max_list_count', 10); if ($authenticated_count && $max_users) { $items = db_query_range('SELECT u.uid, u.name, MAX(s.timestamp) AS max_timestamp FROM {users} u INNER JOIN {sessions} s ON u.uid = s.uid WHERE s.timestamp >= :interval AND s.uid > 0 GROUP BY u.uid, u.name ORDER BY max_timestamp DESC', 0, $max_users, array(':interval' => $interval))->fetchAll(); $output .= theme('user_list', array('users' => $items)); } $block['subject'] = t('Who\'s online'); $block['content'] = $output; } return $block; }}
) @. _, u" k* K/ E' J' Z了解完上面两段user.modul中的代码后,我们就可以开始对其进行覆写工作了。为了实现效果,我们需要分两个步骤来完成,第一步是在你的主题下的template.php中覆写上面两个函数,第二步是在page.tpl.php文件中调用user_login函数。那我们先来看第一步,在template.php中添加下面的CODE:
+ W8 X3 o K+ h9 H( F$ t5 L0 Vfunction custom_user_login_block($form) { $form['#action'] = url($_GET['q'], array('query' => drupal_get_destination())); $form['#id'] = 'user-login-block'; $form['#validate'] = user_login_default_validators(); $form['#submit'][] = 'user_login_submit'; $form['#prefix'] = ''; $form['#suffix'] = ''; $form['name'] = array( '#type' => 'textfield', '#prefix' => '', '#suffix' => ' ', '#maxlength' => USERNAME_MAX_LENGTH, '#size' => 15, '#required' => TRUE, '#default_value' => 'Username', '#attributes' => array('onblur' => "if (this.value == '') {this.value = 'Username';}", 'onfocus' => "if (this.value == 'Username') {this.value = '';}" ), ); $form['pass'] = array( '#type' => 'password', '#maxlength' => 60, '#size' => 15, '#required' => TRUE, '#prefix' => ' ', '#suffix' => ' ', ); $form['actions'] = array('#type' => 'actions'); $form['actions']['submit'] = array('#type' => 'submit', '#value' => 'Login'); $items = array(); if (variable_get('user_register', USER_REGISTER_VISITORS_ADMINISTRATIVE_APPROVAL)) { $items[] = l(t('Create new account'), 'user/register', array('attributes' => array('title' => t('Create a new user account.')))); } $items[] = l(t('Request new password'), 'user/password', array('attributes' => array('title' => t('Request new password via e-mail.')))); $form['links'] = array('#markup' => theme('item_list', array('items' => $items))); return $form;}function login_bar() { global $user; if ($user->uid == 0) { $form = drupal_get_form('custom_user_login_block');//这里的名称要跟前面定义的函数名一致 return render($form); } else { // you can also integrate other module such as private message to show unread / read messages here return ' ' . t('Welcome back ') . l(ucwords($user->name), 'user/'.$user->uid) . ' ' . l(t('logout'), 'user/logout'); }}
/ `: n* D7 N6 |$ N# A完成了user.module的函数覆写,我们只要在你的主题中page.tpl.php调用 login_bar()就OK了。
8 {; p0 M& B2 o# @: V5 S5 d<?php print login_bar() ?>! F( ]. g" a% w$ }& D* g
这样我们就完成了对User Login的覆写,看看效果吧,是不是很有成就的感觉呀。你可以修改成你自己需要的效果,在加上一点样式那就更完美了。
8 V- d$ `" \5 t6 c. r" l第四种方法:创建单独的block.tpl.php
" R% m) Z7 h E& h2 C这种方法其实原理和第三种方法是一样的,只不他的覆写方式不一样而以,要实现效果我们也需分两步进行,第一步同样是在你主题的template.php文件下覆写user.module中的user_login_block函数,这里还需要增加一个对其theme的 hook,第二步是在你的主题的templates目录下单独为User Login 创建一个block.tpl.php文件。知道方法就好办了,我们接着往下看看其怎么实现吧。首先第一步在template.php加上需要覆写的代码:
. h* v K$ f2 j$ X$ _# e) h; hfunction html5_theme() { return array( 'user_login_block' => array( 'render element' => 'form', 'path' => drupal_get_path('theme', 'html5') . '/templates', 'template' => 'user_login', 'preprocess functions' => array( 'html5_preprocess_user_login_block',//这里的函数名需要和下面的函数名一致 ), ), );}function html5_preprocess_user_login_block(&$variables) { $variables['form']['name']['#title']='用户ID:';//修改用记名 $variables['form']['pass']['#title']='用户密码:';//修改密码 $variables['form']['submit']['#value']='登录';//修改button值 $variables['form']['links'] =' ';//去掉注册和忘记密码两个链接}
( m$ C* p& k* O* y完成第一步后,我们在templates目录下创建一个user_login.tpl.php引擎文件,并加上下面的代码:
( J: i' P. z. ^# _<div id="user-login-name"> <?php print drupal_render($form['name']); ?></div><div id="user-login-pass"> <?php print drupal_render($form['pass']); ?></div><div id="user-login-submit"> <?php print drupal_render_children($form);?></div>" a9 o, Y9 R% c- Q, {
这样我们就完成了,清除缓存,看看效果吧:
* e4 g2 y( H$ n' C从效果中我们可以明显看到button没有换成我们想要的中文,问题出在哪,小生至今天没有弄明白,希望有前辈能赐教。到这就完成了对User Login的覆写,虽然不是太完美,但还是有点成就感,有点飘飘然的感觉哟。感兴趣的也动手试试吧,有更好的办法可别忘了我哟。
. L9 w# H2 o/ g! D& f- t9 b如需转载请注明出处:W3CPLUS( y! {! X, k2 E, p) [3 S$ k2 e
/ \' I5 v9 F. L9 H1 u( w
~, H- t; |* Z% w) x. i7 E5 H$ @
0 ~3 v/ u8 i; u; U
% w, w: j# ~0 U3 o0 Q' ~
( b9 V7 \% G7 l. u; R, J |
|
 [复制链接]

 发表于 10-13-2011 02:41