国外设计欣赏网站 - DOOOOR.com

 找回密码
 注册

QQ登录

只需一步,快速开始

扫一扫,微信登陆

帖子

!!!!!Create an album based image gallery in Drupal 7 using fields and views

[复制链接]
发表于 9-2-2011 06:01 | 显示全部楼层 |阅读模式
Create an album based image gallery in Drupal 7 using fields and viewsPosted by James Tombs on 26 May 2011 21:28pm
0 t$ `7 l" `& K
+ u3 J4 t& R/ N: g

5 P4 H, V, u( k5 L2 G( h
This is a follow up tutorial on the popular Create an album based image gallery in Drupal 6 using CCK and views but for Drupal 7. The tutorial will assume that you have Drupal 7 already installed and ready for use. The following contrib modules are required:
I personally prefer Colorbox to some of the other lightbox modules, but feel free to use whichever one you want, they should all work in the same way. An alternative can be found in Shadowbox. Lightbox2 doesn't have a D7 release at the time of writing and Thickbox has been discontinued, with the maintainer now working on Colorbox.
The following list is the absolute minimum required to get the gallery functionality, if you don't have one of these modules installed you won't be able to complete the tutorial.
  • Views
  • Ctools
  • Colorbox
  • Fields
  • Fields UI
  • Field SQL storage
  • File
  • Image8 \& r5 a0 x, i1 S
Once you have confirmed all these modules are installed you can continue.
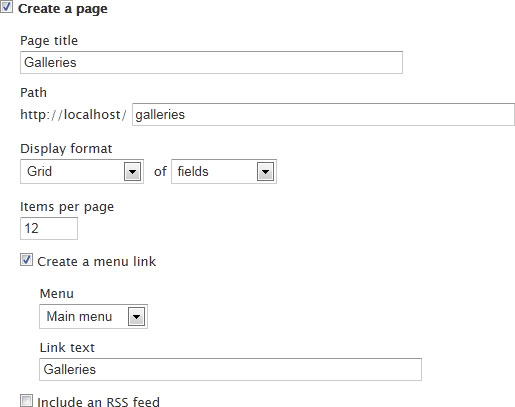
Setting up the content type
The result of this tutorial will be a host of gallery nodes which can include either a predefined number or no limit of images. So we will need to create a content type for these galleries.
Go to Structure then Content types and click the Add content type link.
For the Name, enter Gallery.
Enter a description and set any of the additional settings. I am going to leave them all at default other thanPromoted to front page, which I am going to uncheck (I will show you why later on).
Click Save and add fields. The first thing I am going to do is remove the Body as I won't be using it.
Under Add new field, enter Images in the label box and images in the name box. Under Field, select Image and under Widget select Image. Press Save.
On the next screen just press Save field settings.
Tick the Required field checkbox and enter any restrictions you want to place on image resolution/size. ChangeNumber of values to the maximum number of images you want to appear in each individual gallery, I am going to set this to unlimited. Click Save settings.
Select the Manage display tab. For Label select <Hidden> and for Format select Colorbox. On the right hand side, click on the cog to bring up the settings for the image field. For Node image style select thumbnail ormedium. Leave Colorbox image style set to None (original image). Click Save.
We now have our gallery content type set up. At this point you can set up any permissions you want to give to users so they can create galleries or any workflows that you need to set up or configure.
If possible, create a few test galleries with a few images in each. Doing so will help see what each change in the Views module makes.
Creating the galleries page
Go to Structure then Views and click Add new view.
The Views interface has changed slightly (for the better in my opinion) from D6 which does a fair amount of the work for us. Enter in a name for the View and a description if you wish.
In the first section, select Content of type Gallery sorted by Newest first.
In the next section enter the information like below. You can change most of it, but keep the Display format set to Grid of Fields.
Click Continue and edit.
Under Format, where it says Grid, click the link that says Settings. Change the Number of columns to 3. ClickApply.
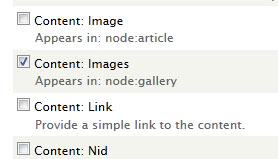
In the Fields section, click the Add button. Click the checkbox next to Content: Images then click Add and configure fields.
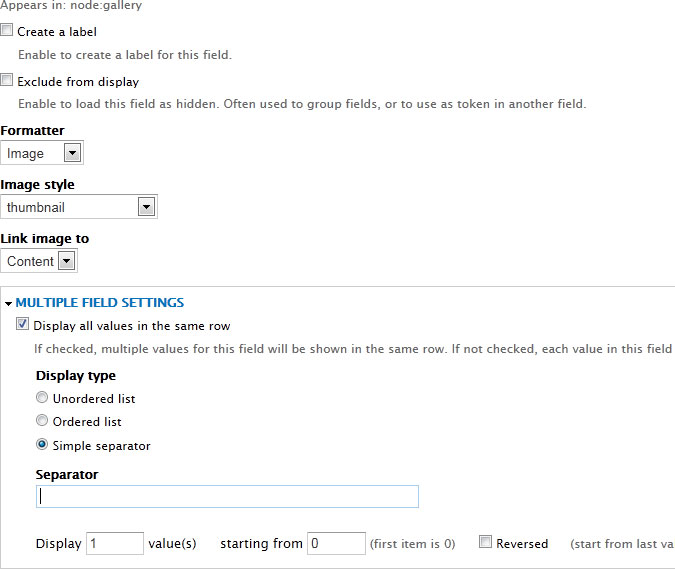
Uncheck the Create a label box and make sure the Formatter is set to Image and Image style is set tothumbnail. For Link image to, set to Content.
Under Multiple field settings make sure the box to Display all values in the same row is checked and theDisplay type is set to Simple separator, then delete the text in the Separator field. Finally set the Display value(s) to 1.
Click Apply.
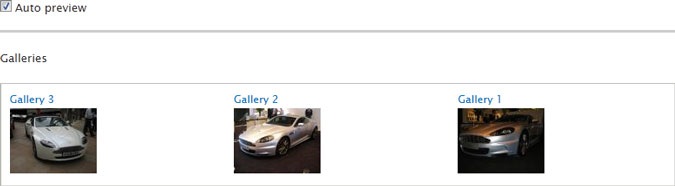
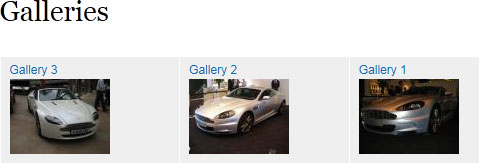
At the bottom of the window the preview should now be showing you what your gallery page will look like.
Click Save at the top right to save the View. Then go the gallery page.
Clicking on one of the images or the gallery title will take you through to the node with the full gallery of images which will open in Colorbox modal window.
Additional changesChanging the HTML of the galleries page
The basic semantics that come out of Views aren't always the best but you have control to change some of this within Views itself. For Drupal 6, I found the Semantic Viewsmodule invaluable, hopefully a full D7 release will come out soon.
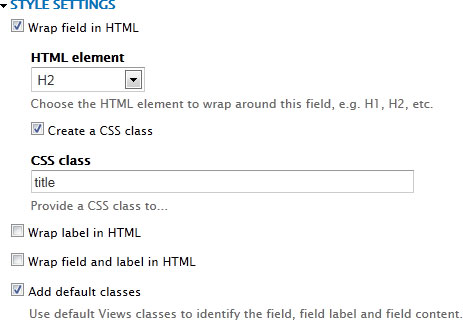
In the View edit screen, under Fields click Content: Title.
Under Style settings, check the box for Wrap field in HTML and set the HTML element to something which fits in with the flow of your page.
Click Apply and save the View.
Have featured galleries appear at the top of the page
You may have some galleries which are to always appear at the top, there are two ways you can do this within Views.
1) Sticky/Promoted content
You can set the ordering of the view so that Sticky/Promoted content appears first. This is fine if you want the display of these galleries to be the same.
2) Views Attachments
If you want to give more focus to the featured galleries, we can create a Views attachment which we can make appear before the rest of the View which will highlight the selected galleries.
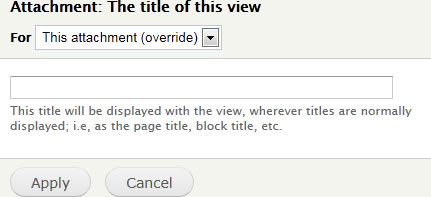
In the edit screen of your view, at the very top under the text Displays click Add then select Attachment.
Under Title, click the link and change the settings so it looks like the following:
Remember to change the For to This attachment (override) so that we don't override the basic page's settings. Click Apply.
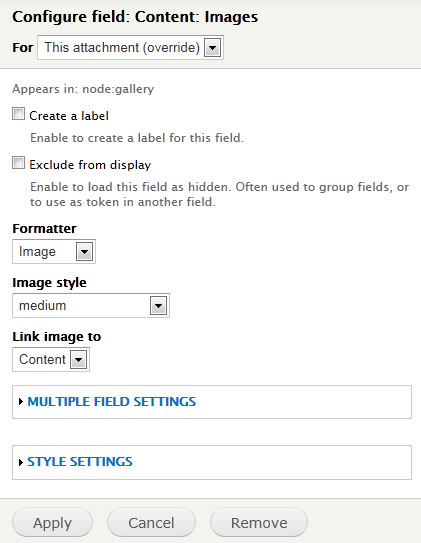
Now under Fields click Content: Images. Again change For to This attachment (override). Change the Image style from thumbnail to medium.
Click Apply.
Next to Filter criteria click the Add button. Select Content: Promoted to front page and press Add and configure filter criteria.
Once again change For to This attachment (override) and set Promoted to front page to Yes. Click Apply. You may need to go back in and set this to Yes again, I think there is a bug in Views when creating a new filter with override selected.
Under Attachment settings, Attach to click Not defined. Tick Page and press Apply.
Under Displays, click Page. That little bug I briefed upon means that the filter has also appeared on our main page (it shouldn't of). Select it and either remove it if you don't mind the featured galleries appearing twice on the page, otherwise set to No and press Apply.
Save the View and go to the galleries page.
Go in to one of the galleries, click Edit and tick the box next to Promote to front page.
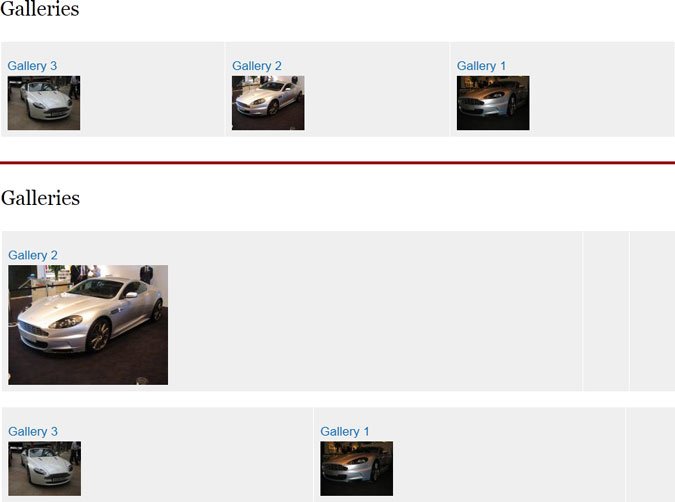
Now go back to your galleries page and you should have two lots of galleries with your promoted gallery appearing at the top with the other galleries underneath with smaller thumbnails. The image below shows what you should have had before promoting the gallery (above the red line) then what it should look like afterwards (below the red line).
All cosmetic changes can be made through the CSS in your theme.
Downloadable Feature
You can download a feature of this from here.
Node view
Some people have mentioned that the node view once you have done this just displays a single column of images and wish to make it a grid like the gallery page. I have written a new tutorial about using Panels and Views to override the node template.

% c; ?6 @. D* ?8 n8 T: Q
2 J( R, ]% u9 S+ ]2 m7 J% C; Q
7 G( b' w  U/ |+ v" ]! G

& |7 T5 L/ f8 a# d# W; Z) {2 F  U

5 p  H+ v- k2 k+ h8 p- E

4 P" O& l6 e# r" ~Nice Job! Thanks for the tutorialSubmitted by Anonymous on Fri, 27/05/2011 - 15:37.0 ^# a7 d: r# l- q
Nice Job! Thanks for the tutorial. Can you make this an exportable feature & share it? THANKS -Austin-
2 T6 r/ d7 f; W8 Y8 U6 o% c3 t3 Z
  • reply
    0 o9 o/ F) T" B$ n% W" J

# d- |* [' c: J, y, S5 z- vGood idea, as requested -Submitted by james on Fri, 27/05/2011 - 18:13.
" ^+ ^* i7 u" b* q% R
* Z# m( @. I5 j
  • reply, k: `, j4 n/ C  ^# W, R9 u0 C

- V6 a/ d2 R" Y+ @  V/ Y2 ^- ^
  A9 M! k7 x6 S2 q6 R9 z: m+ _
THANK YOU!Submitted by Anonymous on Mon, 30/05/2011 - 17:05.
' m1 ]" R5 _" e3 L: }2 S$ d3 W" y$ D
This was extremely helpful, thank you very much, Jason!!

+ `% R1 v/ X3 j, ~3 `
  • reply
    7 r( F" V' i+ F( n9 Y) ^$ _- F

/ t- v9 X# q* Q8 p( Z0 s, ?SajidSubmitted by Anonymous on Wed, 01/06/2011 - 07:25.
6 z4 M  S. X" e: V7 s% U
Fantastic tutorial mate!!

9 L4 G9 O. @% z( ?/ ]+ d9 L; B# T$ L. k: |
  • reply
    % L' L6 O) C2 T% N$ G

2 ^& V3 e5 p: L) ^* i' VAwesome tutorial! I do haveSubmitted by Anonymous on Sat, 04/06/2011 - 01:08.( Y( u; U5 @2 H5 Q
Awesome tutorial! I do have one question though; about the individual gallery pages. So I set up the gallery content type gallery, but it's not very pretty. Is there a way to customize the layout of each gallery with views or something? Thanks for any help!

$ ]: `! S# P0 h: l
  • reply8 Y9 F4 k0 T: T9 q. w8 P& q' B

  ^5 W2 I& J$ eIn Drupal 6 I used the PanelsSubmitted by james on Sat, 04/06/2011 - 08:29.: H5 w( i, |- D9 B
In Drupal 6 I used the Panels node template to display a view rather than using the content types node-type.tpl.php.
Similar to this but using node template rather than taxonomy. Then in views you would do the grid layout with an argument of the node NID from the URL and make sure the images field isn't grouping images.
3 e4 T7 q/ f/ x: _; h/ S
  • reply3 o( n' C: ]/ z: w3 f
3 ?) g% t. ~# u+ v5 i
Thanks for suggestion, but ISubmitted by Anonymous on Sat, 04/06/2011 - 17:16.
5 U8 ?: T  J( A7 R: `# |: d1 d
Thanks for suggestion, but I cam up with a slightly different solution (without using Panels, yay!). So in the galleries views, I made the text and image link to another custom view *instead* of linking to the physical node (I basically try to remove all references to the physical node, as it would just confuse people). That custom view contains a path argument of "gallery/%" and a "Content: Nid" contextual filter to pull the node ID from the URL, of course! And as far as the layout goes, I found that I prefer the content displayed as an unformatted list with no grouping, and the format should be set to fields. Then, in the fields, I have the title of the gallery and the images are displayed with just a space as a separator. Pagination set to 12 images per page. Since I didn't need comments or a direct way to edit a gallery, it's a pretty simple solution.
I would have liked to use a grid, but when I set the format to that, the images are all put into the first grid space with the other ones showing up empty but still visible. Any reason for this?
Thanks for all of your help again!

. s6 D9 g1 e% i: j/ i. [7 z
  • reply
    - a- @" ?" A; C1 P) I
3 f' F' U& m4 C0 P
I guess there may be aSubmitted by james on Sat, 04/06/2011 - 19:38.
+ `  k+ z7 w/ [9 v5 b6 J
I guess there may be a setting within Views that you are missing. Perhaps you have grouping enabled?
Your solution works but isn't one that I would go down unless you sort out redirection of the node/[nid] URL otherwise you could get penalised by Google for duplicate content.
If you want a bit more control over the layout of your page, try Semantic Views which allows you to define your own HTML markup for the display which not only cuts down on the HTML produced which makes the page smaller but also allows you to style it your way.

- E. H, y) C. n9 {& U# P' ]. C

9 I/ M5 d' b+ p  G$ R

7 r( H9 C( F/ [+ D$ Largument of the node NID?Submitted by Anonymous on Wed, 17/08/2011 - 20:42.1 l5 w) }1 ]2 P" Y( T% p4 j9 w
Could you be more specific on how to write the argument of the node NID? I have no idea where to start with the code for writing that. I need my images to break into multiple rows, rather than one long column, and have been at this for days. Please help! A detailed tutorial would be great.

9 \% K! T9 }2 K( p4 h
6 b9 C- w' I1 g6 G* g. e
I have written anotherSubmitted by james on Thu, 18/08/2011 - 18:15.
4 N3 J; p" L* B% ]$ t
I have written another tutorial on doing this here

' {( s$ H$ w5 Y5 j0 ^' Z
  • reply7 Z( Y# R3 ?/ l) I1 ^& [
0 D, u  t) Z: A

+ u! G( ~/ Y& S5 K5 V6 W4 i
, s" o  y2 ^$ q& @; Y4 W7 ^+ R

  ~. N* O1 k- S" \2 s1 f% o' uWhere is the "buy me a beer"Submitted by Anonymous on Fri, 17/06/2011 - 07:23.# T/ w1 G4 u; L, ?
Where is the "buy me a beer" button on this site? :) Thanks a million James, thanks a million ..
-iS
5 ]6 @, b) D; |1 R4 q( a  b3 L8 U
  • reply- [) v$ h# ^, C7 U) a
7 s5 M: @" F: T& _
Thanks!Submitted by Anonymous on Sun, 19/06/2011 - 20:14.* h( T2 k! _+ U- y1 d5 T# w8 W
This is a fantastic tutorial for Drupal noobs like myself! Thank you so so much!

0 u# \% ]- f: `6 g
  • reply8 i& ^7 z3 P' H/ K1 g# Y6 U

$ q- F8 d- b: ?! G9 o6 i; w5 cdoubtSubmitted by Anonymous on Mon, 20/06/2011 - 07:03.3 e5 f! I+ U( p) A% [
I am newbie plz tell me where to upload the photo........
% f& b  N8 v7 t- ?' g; O5 B
0 H# C5 s2 ]( ?4 T# A0 I
Content > add contentSubmitted by james on Mon, 20/06/2011 - 16:57.
8 U0 b# w& j. @7 M/ B
Content > add content

& n% H% G$ A& ?3 q
  • reply# A4 @1 Y" V& N- z) t5 H- C

! m4 H4 x- f  [. |6 r

7 }7 r  @) q' S. D, |; y" f1 w- LLayout in albumSubmitted by Anonymous on Sat, 02/07/2011 - 15:51.
1 X5 ?, C; a0 {2 u6 h* E
I love the setup, it totally works... but how can you get multiple columns within an album?

& }+ J3 p! U) v% i/ i" E* o
  • reply
    % W0 T% h, x, i7 z) K; u

1 I. C% ^7 u# [. ~* h5 o! tBest done through your themeSubmitted by james on Sat, 02/07/2011 - 17:17.: ]% c3 H4 m- d- H1 |/ D+ u
Best done through your theme with a custom node-gallery.tpl.php or you could use a panel override for the node view and put a view in that panel that uses the node id as the argument with the grid view selected.
Alternatively, the simple solution would be to add a bit of CSS.

& [9 C% q& w5 Z4 G; g
8 j, r: C* ?' p+ ^

5 @8 `) \  ]! D; F8 o' TOne step missingSubmitted by Anonymous on Tue, 05/07/2011 - 04:41.
9 k9 X! x: a: \0 }
Great tutorial, thanks. Under "setting up the content type," you don't say what choice we should make for "Widget." I am guessing ... "Image"?

# ?- s" T  ^( }# [4 P
  • reply% Z/ O, @0 w, j6 o# n

! O  {# w7 |- s; U- ?  t- M- dYes, it does say: "Under AddSubmitted by james on Tue, 05/07/2011 - 08:33.
; K& J' t) Q% h6 G- f3 s
Yes, it does say:
"Under Add new field, enter Images in the label box and images in the name box. Under Field, select Image. Press Save."

+ Y5 r! E" `- H" R$ {' \
  • reply* ]+ t2 e2 d: S0 u( ?0 }

1 B- j: T& {/ E9 L) @) H  C5 KFour thingsSubmitted by Anonymous on Tue, 05/07/2011 - 22:19.
3 z! S/ E7 x; G6 Z
>> Yes, it does say: "Under Add new field, enter Images in the label box and images in the name box. Under Field, select Image. Press Save."
There are four fields to fill out, not three: Label, Name, Field and Widget.
4 I' t- I* n- B6 U" i2 \
  • reply
      x" p. o2 z# B3 E6 `0 B
$ \5 G) [. q6 k, [% d! C
I will update the tutorialSubmitted by james on Tue, 05/07/2011 - 22:20.
# f$ L. u- M# |& H$ r  @" _& ^
I will update the tutorial but most people won't have anything else under the Widget field unless they have some other module installed.
6 h9 u- [) X1 X
  • reply8 w  D# ]2 _2 e" H* ?. Z9 \

6 Y  c8 q. T& C, |% L$ \
" `& E1 @0 `, p) i( F. G3 K
The Four FieldsSubmitted by Anonymous on Tue, 05/07/2011 - 23:14.
4 r, Z1 y( J8 U, u  L4 ]
>> Yes, it does say: "Under Add New Field, enter Images in the Label box and Images in the Name box. Under Field, select Image. Press Save."
It does indeed say that but there are four fields to fill out, not three: Label, Name, Field and Widget.

7 f' j# q6 D  V) E7 H+ Y2 a
  • reply6 c) ]' |0 {4 W2 L' }& j
. x3 ~5 ?" D" J6 r  C. a0 }, z! T
+ {+ ~2 X: A. @, t+ d5 Q
/ w4 i2 ~+ `; E0 g
Gridless GallerySubmitted by Anonymous on Tue, 05/07/2011 - 22:14.
' _8 r$ j* g  l
Great tutorial, thanks. So when I go to the actual gallery, the thumbnails are stacked vertically, not arranged in a grid. What am I doing wrong? Or am I not doing enough.
* M) D7 l0 `, x7 ~8 P" L3 R/ p
  • reply+ j' G7 h# C/ f7 U% Z; }

0 @1 ^, y. N) V/ d5 I& dYou aren't doing enough butSubmitted by james on Tue, 05/07/2011 - 22:19.
2 Y& f- L" P4 }0 R5 S% \& r6 }
You aren't doing enough but only because the tutorial doesn't go on that far.
There are a few ways of achieving the grid for the actually gallery node.
  • Create a view with an argument using the node ID and add this to a panel override of the gallery node type.
  • Create a node-gallery.tpl.php in your theme and theme it how you want
  • Change the HTML output in your template.php file
  • Use CSS to float the images to make a grid like layout.5 H, Y5 z. k/ `: i# j5 c

+ _0 a7 t* y/ G* F6 x$ |) ~1 e
  • reply
    * v$ {1 F5 l* \/ b$ c

' J) `, j' V4 u, j2 XWhat CSS do I edit?Submitted by Anonymous on Sat, 06/08/2011 - 00:08.
! B2 A5 m/ r# G8 A. |. l
Which CSS file do I edit? I am trying to get the images to appear in rows when the album is clicked on, and honesty I am a noob with css, so I am have a tough time trying to figure out how to make the images appear in rows instead of a never ending column. Please help!!

7 }2 |3 h' m8 C- t
" l+ n: E) l( o3 B" H
Your themes CSS file. YouSubmitted by james on Mon, 08/08/2011 - 11:11.
" ^% |! y" D3 V2 I5 r. N
Your themes CSS file.
You may also want to look at Display Suite

6 N8 A$ n+ Y/ {7 T3 f3 p, a* H2 z
  • reply  y& D% R" |$ v' R  q( W
. c0 a+ w3 N* I+ G" R

  U) J, b2 A- b+ x; ]
2 ?1 @0 ^9 L  d$ i& K) J/ {

+ @+ e' w9 i( h6 t9 T2 N0 i* kIt niceSubmitted by Anonymous on Sat, 09/07/2011 - 07:05.9 ]" J8 i$ s9 T) ?% o( @7 N  i/ r# ^
Hi thanks you so much i done with it. But how can i Scale And Crop images in thumbnails. Because my images resolution is not the same so when i view is look not good.
Any ideas thanks

0 r% @* e! a, d7 k: ~. o( s
  • reply% r$ {8 A4 Z: J# F( z

/ p$ i3 W( K& r) k! h1 B5 A2 Z/ dYou will need to set up a newSubmitted by james on Wed, 13/07/2011 - 17:13.$ t" T- V# I+ S: ^7 D$ R% Y
You will need to set up a new image style like you would with Imagecache in Drupal 6.

+ i7 U3 n- I; n" U, s/ X' H
  • reply" b$ S+ T- s7 [* n  w" u3 ]

, S: l- ?$ _6 k& @' }

' d  l$ _' F- M: tgalleriessSubmitted by Anonymous on Mon, 08/08/2011 - 08:17.
3 K/ e+ {9 j* n( K/ E# c
thanks for tutorial.............
9 @+ ]. S4 T. I% W
' s- Z  {: q5 M
galleriessSubmitted by Anonymous on Mon, 08/08/2011 - 08:21.# x. [# D; }5 Y* }5 [1 _
thanks for tutorial.............

( V7 k+ J$ @3 C" ~
  • reply
    9 y$ H! u: c3 J) _) P8 v5 m

& t0 ?: p4 X" k7 i) M; K) a# N, X
. q" K; E% t' Q

& l+ Q! Z+ z* x- l/ Y) E( C+ ~

|2011-2026-版权声明|平台(网站)公约|DOOOOR 设计网 ( 吉ICP备2022003869号 )

GMT+8, 3-17-2025 08:47 , Processed in 0.282467 second(s), 47 queries .

Powered by Discuz! X3.4

Copyright © 2001-2021, Tencent Cloud.

快速回复 返回顶部 返回列表